如今,即便是最简单的计算机程序也会包含一个偏好设置窗口,用户可以在其中设置应用专属的选项。在MAC OS X中,Preferences…菜单通常位于应用菜单中。选择该菜单项会弹出一个窗口,用户可以在其中输入和更改各种选项。iPhone和其他iOS设备有一个专门的“设置”应用程序来进行各种设置,你肯定用过很多次了。
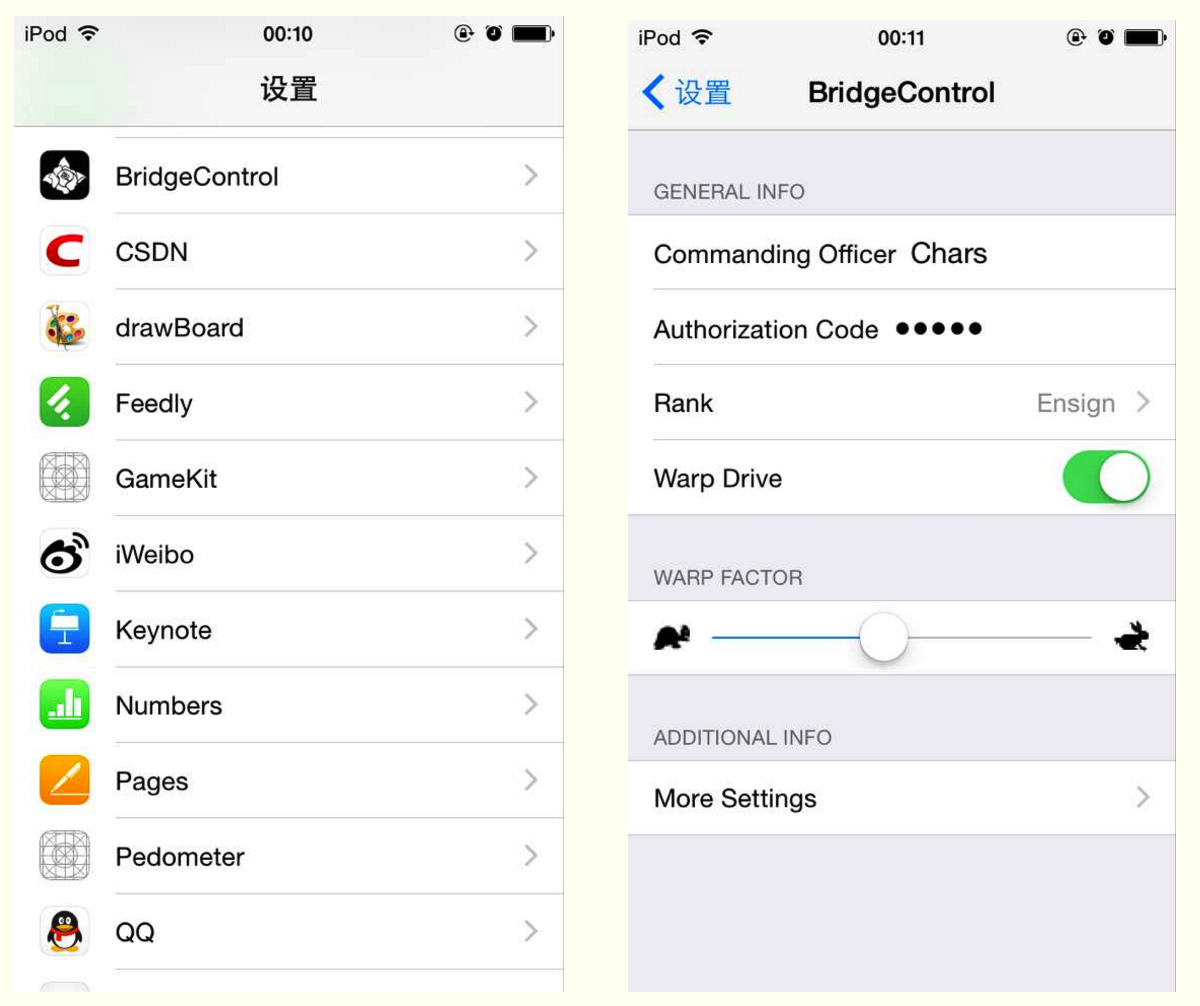
设置捆绑包 通过应用设置,用户可以输入和更改任何带有设置捆绑包(settings bundle)的应用中的偏好设置。设置捆绑包是应用自带的一组文件,用于告诉设置该应用期望得到用户的哪些偏好设置。下图是实例效果图:
对于iOS用户默认设置(User Defaults)机制,设置应用充当着通用用户界面的角色。用户默认设置是保存和获取偏好设置的系统的一部分。
在iOS应用中,用户默认设置由NSUserDefaults类实现。应用通过NSUserDefaults用键值对的方式来读取和保存偏好设置数据,与通过键从NSDictionary对象中获取数据一样。不同之处在于NSUserDefaults数据会被持久保存在文件系统中,而不是存储在内存的对象实例中。
应用 接下来的部分,通过创建一个简单的应用,来实现应用设置控制应用程序。
创建应用 在Xcode中,创建Tabbed Application工程。
使用设置捆绑包 设置应用使用每个应用中设置捆绑包的内容构建出一个应用的设置视图。如果应用没有设置捆绑包,则设置应用不会显示出应用程序的任何信息。每个设置捆绑包必须包含一个名为Root.plist的属性列表,它定义了根级偏好设置视图。此属性列表必须遵循一种非常严格的格式。
当设置应用启动时,它会检查每个应用程序的设置捆绑包并为包含设置捆绑包的每个应用添加设置组。
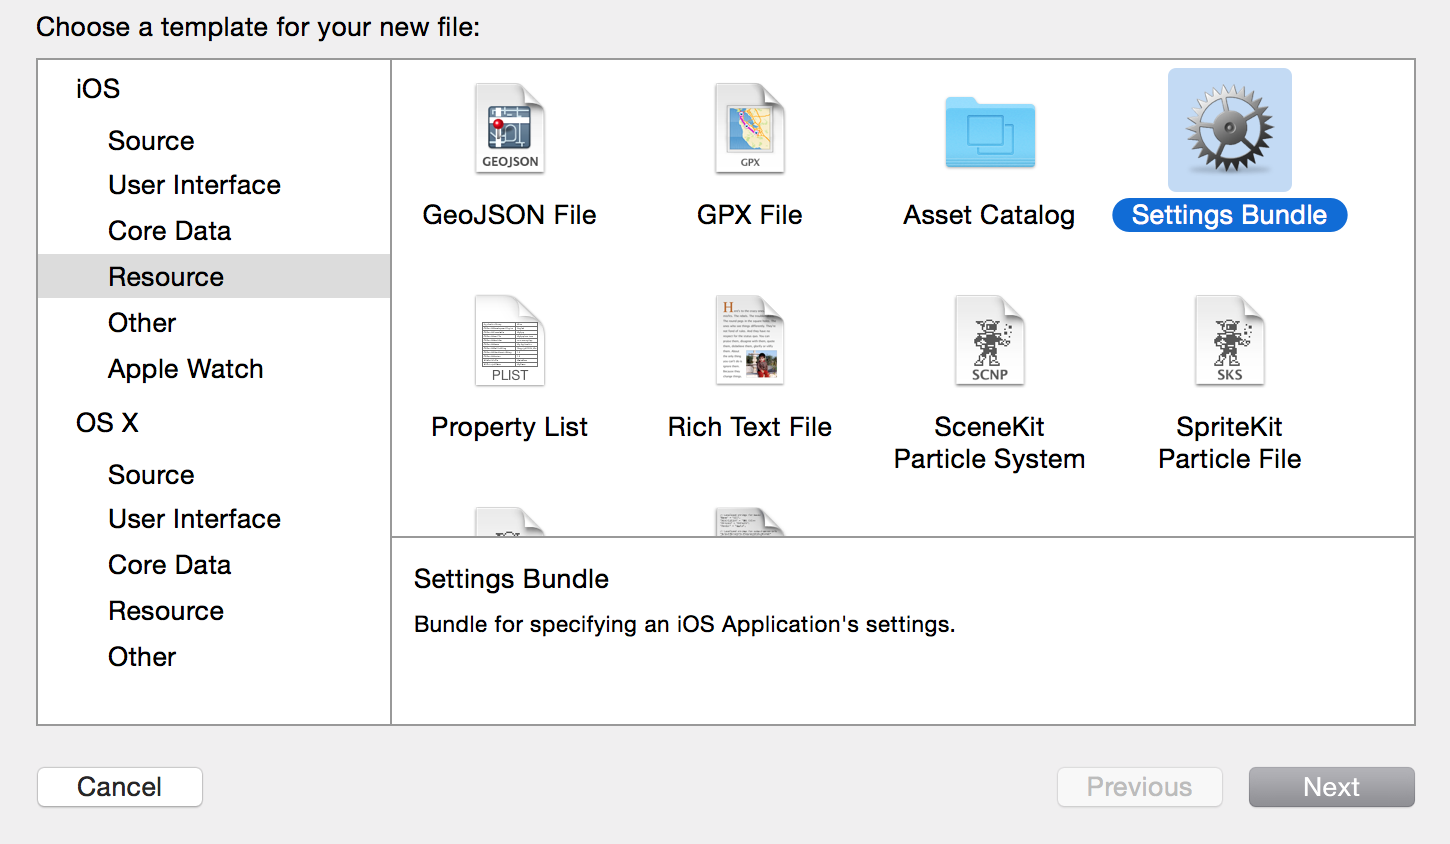
在项目中添加设置捆绑包 新建设置捆绑包,操作如下图
在iOS-->Resource-->Settings Bundle点击Next,名字保留默认,最后点击Create即可。
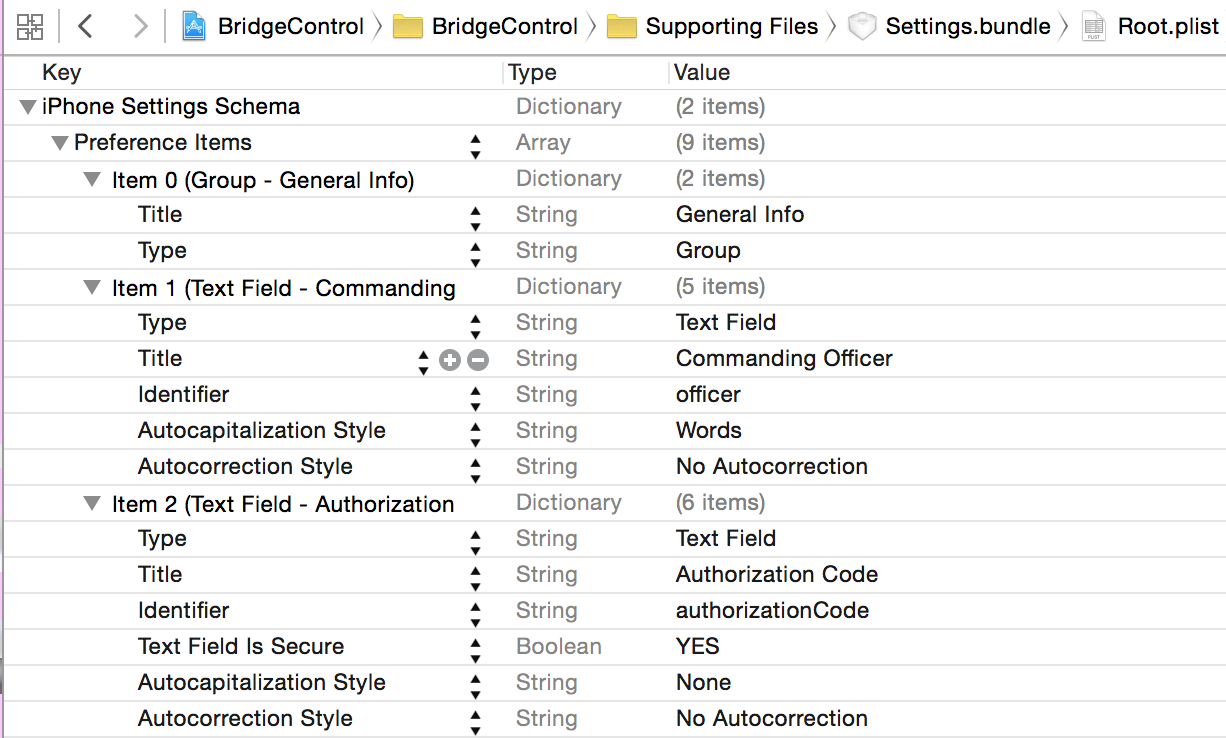
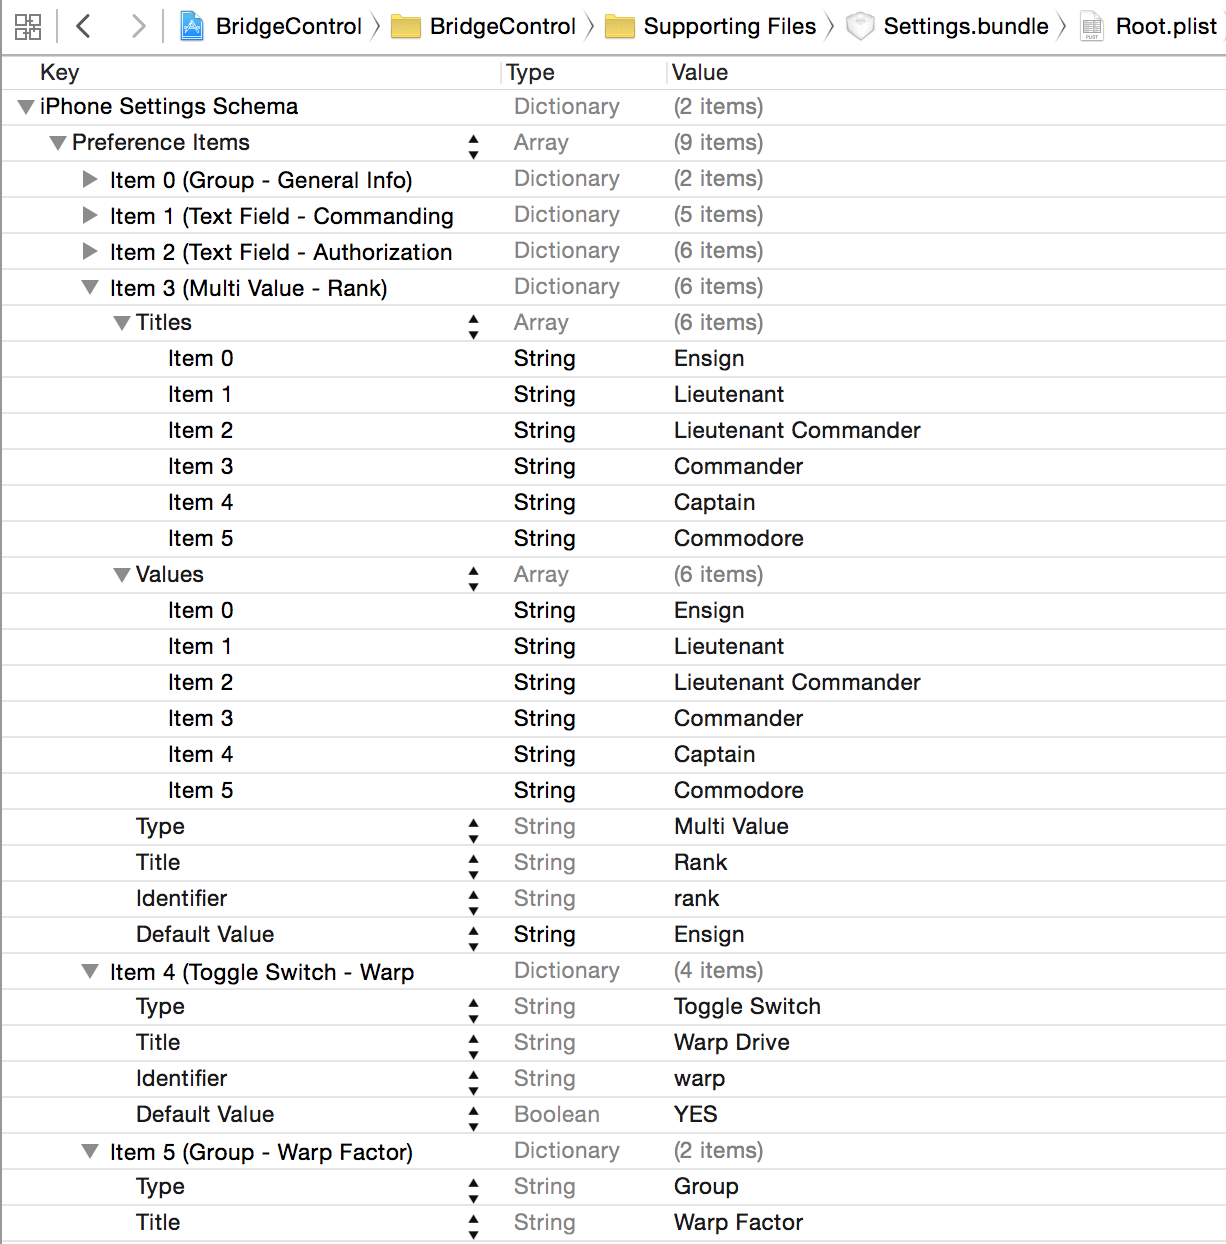
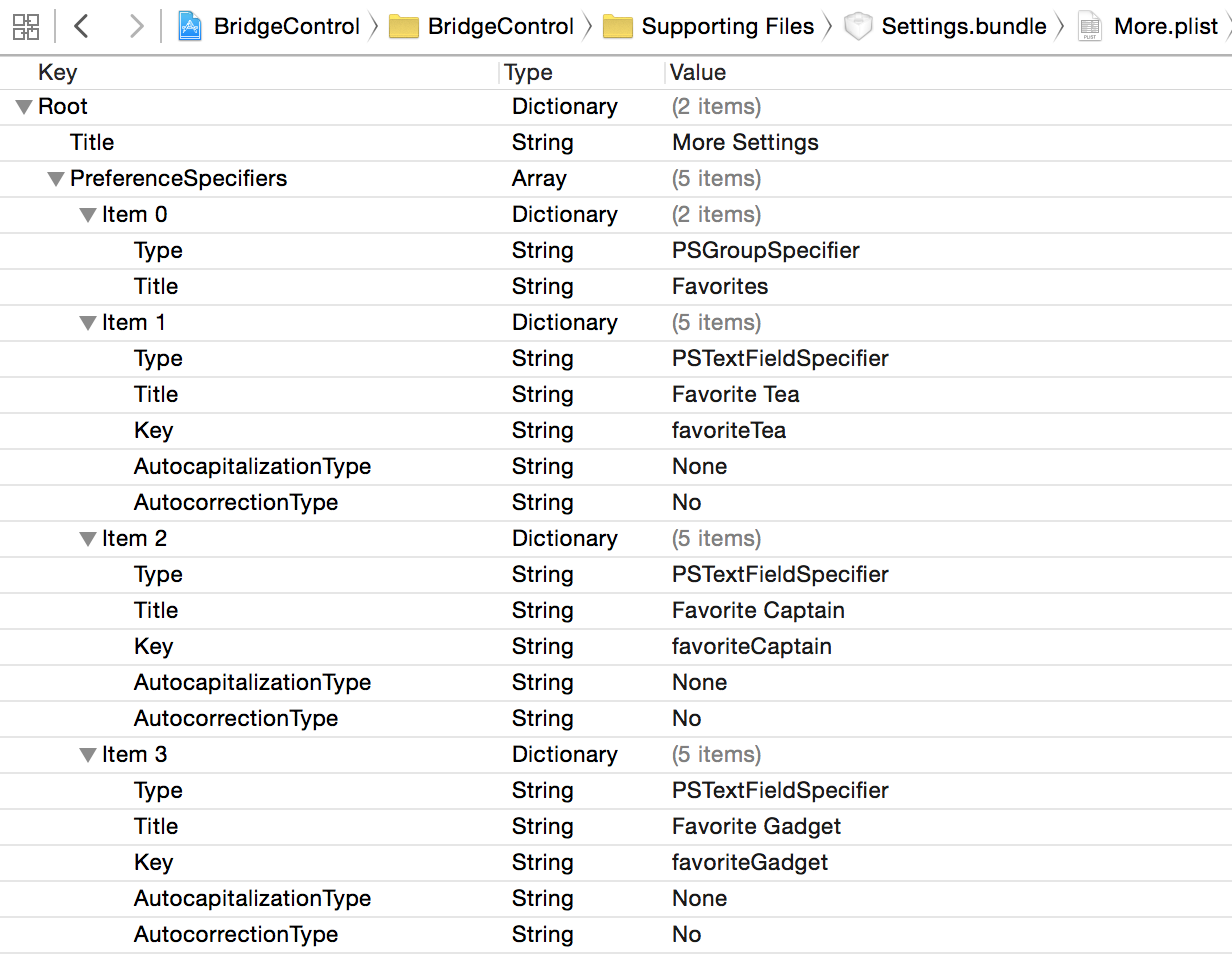
编辑属性列表文件 接下来需要编辑Root.plist文件,具体内容如下图
在Item8中,引用的More.plist文件,具体内容如下图
这里需要补充说明一点:
iOS上的应用不能从其他应用的沙盒中读取文件。设置捆绑包并不是我们应用沙盒的一部分,而是设置应用沙盒的一部分。
设计展示界面 数据准备好之后,添加图标资源,设计数据展示界面。效果图如下
界面是通过代码实现的,主要使用了如下几个控件:
1
2
3
4
5
6
7
8
9
10
11
12
13
@interface FirstViewController () @property (nonatomic, strong) UILabel *officerLabel; @property (nonatomic, strong) UILabel *authorizationCodeLabel; @property (nonatomic, strong) UILabel *rankLabel; @property (nonatomic, strong) UILabel *warpDriveLabel; @property (nonatomic, strong) UILabel *warpFactorLabel; @property (nonatomic, strong) UILabel *favoriteTeaLabel; @property (nonatomic, strong) UILabel *favoriteCaptainLabel; @property (nonatomic, strong) UILabel *favoriteGadgetLabel; @property (nonatomic, strong) UILabel *favoriteAlienLabel; @end
1
2
3
4
5
6
7
@interface SecondViewController () @property (nonatomic, strong) UISwitch *engineSwitch; @property (nonatomic, strong) UISlider *warpFactorSlider; @property (nonatomic, strong) UIButton *settingInfo; @end
读取应用中的设置 我们将使用NSUserDefaults类访问用户设置。NSUserDefaults作为单例类,意味着应用中只能有一个NSUserDefaults实例在运行。为了访问这个实例,需要调用standardUserDefaults。
键宏定义 1 2 3 4 5 6 7 8 9 10 11 12 13 14 #ifndef BridgeControl_Constants_h #define BridgeControl_Constants_h #define kOfficerKey @"officer" #define kAuthorizationCodeKey @"authorizationCode" #define kRankKey @"rank" #define kWarpDriveKey @"warp" #define kWarpFactorKey @"warpFactor" #define kFavoriteTeaKey @"favoriteTea" #define kFavoriteCaptionKey @"favoriteCaptain" #define kFavoriteGadgetKey @"favoriteGadget" #define kFavoriteAlienKey @"favoriteAlien" #endif
更新主视图控制器 1 2 3 4 5 6 7 8 9 10 11 12 13 14 15 16 17 18 19 20 //FirstViewController.m - (void)viewDidLoad { [super viewDidLoad]; // Do any additional setup after loading the view, typically from a nib. [self refreshFields]; } -(void)refreshFields{ NSUserDefaults *defaults = [NSUserDefaults standardUserDefaults]; self.officerLabel.text = [defaults objectForKey:kOfficerKey]; self.authorizationCodeLabel.text = [defaults objectForKey:kAuthorizationCodeKey]; self.rankLabel.text = [defaults objectForKey:kRankKey]; self.warpDriveLabel.text = [defaults boolForKey:kWarpDriveKey] ? @"engaged" : @"Disabled"; self.warpFactorLabel.text = [[defaults objectForKey:kWarpFactorKey] stringValue]; self.favoriteTeaLabel.text = [defaults objectForKey:kFavoriteTeaKey]; self.favoriteCaptainLabel.text = [defaults objectForKey:kFavoriteCaptionKey]; self.favoriteGadgetLabel.text = [defaults objectForKey:kFavoriteGadgetKey]; self.favoriteAlienLabel.text = [defaults objectForKey:kFavoriteAlienKey]; }
1 2 3 4 5 6 7 8 9 10 11 12 13 //SecondViewController.m - (void)viewDidLoad { [super viewDidLoad]; // Do any additional setup after loading the view, typically from a nib. [self refreshFields]; } -(void)refreshFields{ NSUserDefaults *defaults = [NSUserDefaults standardUserDefaults]; self.engineSwitch.on = [defaults boolForKey:kWarpDriveKey]; self.warpFactorSlider.value = [defaults floatForKey:kWarpFactorKey]; }
添加控件响应事件 为SecondViewController中的UIButton,UISwitch和UISlider控件添加监听事件。
1 2 3 4 5 6 7 8 9 10 11 12 13 14 15 - (void)engineSwitchTapped { NSUserDefaults *defaults = [NSUserDefaults standardUserDefaults]; [defaults setBool:self.engineSwitch.on forKey:kWarpDriveKey]; [defaults synchronize]; } - (void)warpSliderTouched { NSUserDefaults *defaults = [NSUserDefaults standardUserDefaults]; [defaults setFloat:self.warpFactorSlider.value forKey:kWarpFactorKey]; [defaults synchronize]; } //切换到“设置”应用程序 -(void)settingInfoClicked{ [[UIApplication sharedApplication] openURL:[NSURL URLWithString:UIApplicationOpenSettingsURLString]]; }
注册默认值 1 2 3 4 5 6 7 8 9 10 11 12 13 //AppDelegate.m - (BOOL)application:(UIApplication *)application didFinishLaunchingWithOptions:(NSDictionary *)launchOptions { // Override point for customization after application launch. //程序启动后的一些自定义设置 NSDictionary *defaults = @{kWarpDriveKey:@YES, kWarpFactorKey:@2, kFavoriteAlienKey:@"Vulcan" }; [[NSUserDefaults standardUserDefaults] registerDefaults:defaults]; return YES; }
保证设置有效 如果现在将应用运行,查看设置信息并按下主屏幕按钮来修改一些值。然后再按Home键,再重新打开应用,结果发现设置并没有生效。
原因在于:在iOS中,当应用正在运行时按Home键并不会退出该应用,而是由操作系统在后台将其暂停,这样它就能随时快速启动。
在这个例子中,我们需要添加一点工作,以实现应用被唤醒时,能重新加载用户偏好设置并重新显示它们。
通知,时对象之间进行通信的轻量级机制。任何对象都能定义一个或多个发送到应用通知中心的通知。通知中心是一个单例对象,作用在于对象之间传送通知。
UIApplication类会发送大量的通知,大多数通知的用途从命名就能看出来,这个例子中我们就使用到了通知。
将下列代码添加到两个控制器的viewDidLoad方法中:
1
2
UIApplication *app = [UIApplication sharedApplication]; [[NSNotificationCenter defaultCenter] addObserver:self selector:@selector(applicationWillEnterForeground:) name:UIApplicationWillEnterForegroundNotification object:app];
然后添加相应的响应方法
1
2
3
4
5
6
-(void)applicationWillEnterForeground:(NSNotification *)notification{ NSUserDefaults *defaults = [NSUserDefaults standardUserDefaults]; [defaults synchronize]; [self refreshFields]; }
小结 本文主要讲解了如何使用应用设置,如何使用NSUserDefaults读取偏好设置,以及如何让用户在应用内修改偏好设置。